As a developer, there is a 90% chance that the client or the business will come to you one day and say “look we are doing this the old way, but we want software now for this”. And there is a big chance that they will have some procedure with a lot of if-else scenarios. There also might be an option for a part of the procedure to be repeated for every customer that they have which means you will have to execute the same logic multiple times. If that happens, don’t be scared, Camunda is here to help and I hope that this blog will help you. We are going to dive into Camunda processes and how we can handle a part of it being repeated multiple times. In order to follow it may be some basic Camunda knowledge, Java and Spring Boot can be of help.
Let’s look at the following scenario:
We have a bank and in it, there is one guy responsible for the whole process of giving loans to people. He is sitting there and a guy John comes and he wants to get a loan. So the bank guy first gives an application to John. Once John is done with the application and returns it to the bank guy, the bank guy requests some documents from his place of work so they can be sure that he is employed full-time. Once that is done, the bank guy needs to send this to corporate so that they can make the final decision.
If we make a diagram of it, it will look something like this:
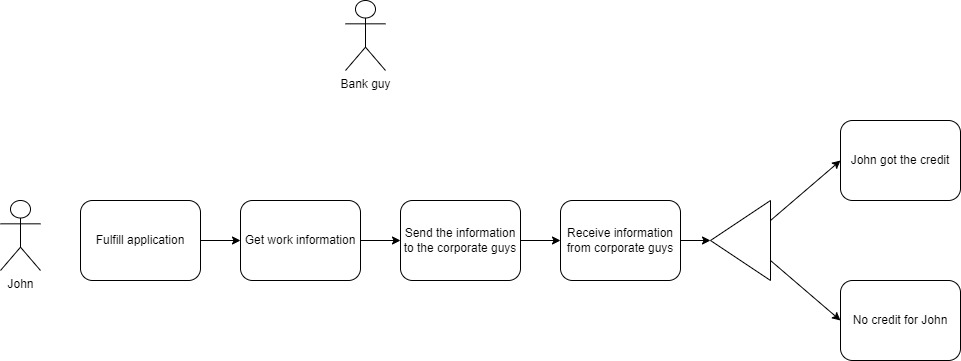
This is great and everything if you have one customer, but if you have around 100 customers per day the bank guy will have no clue which guy gave him the work information or filled the application.
So let’s make software for this guy and make his life easier, let’s open our Intellij and write some code!
I have already created the project (you can download it from here) and will go through some of the more important things.
First, let’s take a look at the pom file:
<?xml version="1.0" encoding="UTF-8"?>
<project xmlns="http://maven.apache.org/POM/4.0.0" xmlns:xsi="http://www.w3.org/2001/XMLSchema-instance"
         xsi:schemaLocation="http://maven.apache.org/POM/4.0.0 https://maven.apache.org/xsd/maven-4.0.0.xsd">
    <modelVersion>4.0.0</modelVersion>
    <parent>
        <groupId>org.springframework.boot</groupId>
        <artifactId>spring-boot-starter-parent</artifactId>
        <version>2.6.1</version>
        <relativePath/> <!-- lookup parent from repository -->
    </parent>
    <groupId>north.com</groupId>
    <artifactId>multi-process-instance</artifactId>
    <version>0.0.1-SNAPSHOT</version>
    <name>multi-process-instance</name>
    <description>multi-process-instance</description>
    <properties>
        <java.version>11</java.version>
    </properties>
    <dependencies>
        <!-- Spring -->
        <dependency>
            <groupId>org.springframework.boot</groupId>
            <artifactId>spring-boot-starter-web</artifactId>
        </dependency>
        <dependency>
            <groupId>org.springframework.boot</groupId>
            <artifactId>spring-boot-starter-data-jpa</artifactId>
        </dependency>

        <dependency>
            <groupId>org.springframework.boot</groupId>
            <artifactId>spring-boot-starter-test</artifactId>
            <scope>test</scope>
        </dependency>

        <!-- Camunda -->
        <dependency>
            <groupId>org.camunda.bpm.springboot</groupId>
            <artifactId>camunda-bpm-spring-boot-starter-rest</artifactId>
            <version>7.14.0</version>
        </dependency>
        <dependency>
            <groupId>org.camunda.bpm.springboot</groupId>
            <artifactId>camunda-bpm-spring-boot-starter-webapp</artifactId>
            <version>7.14.0</version>
        </dependency>
        <dependency>
            <groupId>org.camunda.bpm</groupId>
            <artifactId>camunda-engine-plugin-spin</artifactId>
            <version>7.14.0</version>
        </dependency>
        <dependency>
            <groupId>org.camunda.spin</groupId>
            <artifactId>camunda-spin-dataformat-json-jackson</artifactId>
            <version>1.10.0</version>
        </dependency>

        <!-- Database -->
        <dependency>
            <groupId>com.h2database</groupId>
            <artifactId>h2</artifactId>
            <scope>runtime</scope>
        </dependency>
        <!-- Lombok -->
        <dependency>
            <groupId>org.projectlombok</groupId>
            <artifactId>lombok</artifactId>
        </dependency>
    </dependencies>

    <build>
        <plugins>
            <plugin>
                <groupId>org.springframework.boot</groupId>
                <artifactId>spring-boot-maven-plugin</artifactId>
            </plugin>
        </plugins>
    </build>

</project>
I have added the camunda dependencies because we are going to create camunda processes and an h2 database as well. Even though we are not going to write code that will access the database or create some tables, Camunda needs a database to create its own tables.
Next, let’s look at the application.yml
spring:
  datasource:
    driver-class-name: org.h2.Driver
    url: jdbc:h2:mem:testdb
    username: sa
  jpa:
    database-platform: org.hibernate.dialect.H2Dialect
    hibernate.ddl-auto: update

camunda:
  bpm:
    authorization:
      enabled: false
    default-serialization-format: application/json
    admin-user:
      id: admin
    database:
      type: h2
    generic-properties.properties:
      telemetry-reporter-activate: false
    deployment-resource-pattern:
      - classpath*:processes/*.bpmn
Above we are setting some database properties and some Camunda properties. Mainly we are enabling the admin-user for Camunda to open their cockpit with user admin and we are saying where the processes will be and what kind of database will Camunda use.
Now, having said all that, let’s create the whole scenario as a process in Camunda. First thing you will need is a Camunda modeller which you can download from here. Once you have the modeller up and running go to File -> New File -> BPMN Diagram. What we need to build (or you can just open the existing bpmn diagram from the application) is something that will look like this:
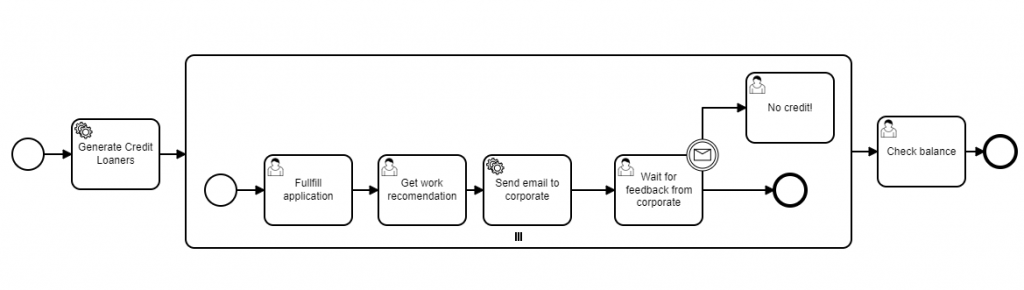
As a first step, we will generate some credit loaners (we are doing this just to have some data to play with) and then set this collection of credit loaners as a value for a variable called creditLoanerList. This will be achieved by using a service task. In this scenario, if you click on the Generate Credit Loaners you will see that we are providing as implementation: Java class and as a java class we are pointing to: north.com.multiprocessinstance.camunda.task.GenerateCreditLoanersTask.java:
package north.com.multiprocessinstance.camunda.task;

import north.com.multiprocessinstance.entity.CreditLoaner;
import org.camunda.bpm.engine.delegate.DelegateExecution;
import org.camunda.bpm.engine.delegate.JavaDelegate;

import java.util.Arrays;
import java.util.List;

public class GenerateCreditLoanersTask implements JavaDelegate {
    @Override
    public void execute(DelegateExecution delegateExecution) throws Exception {
        List<CreditLoaner> creditLoaners = Arrays.asList(new CreditLoaner("Sarah", "Cox"),
                new CreditLoaner("John", "Doe"),
                new CreditLoaner("Filip", "Trajkovski"));
        delegateExecution.setVariable("creditLoanerList", creditLoaners);
    }
}
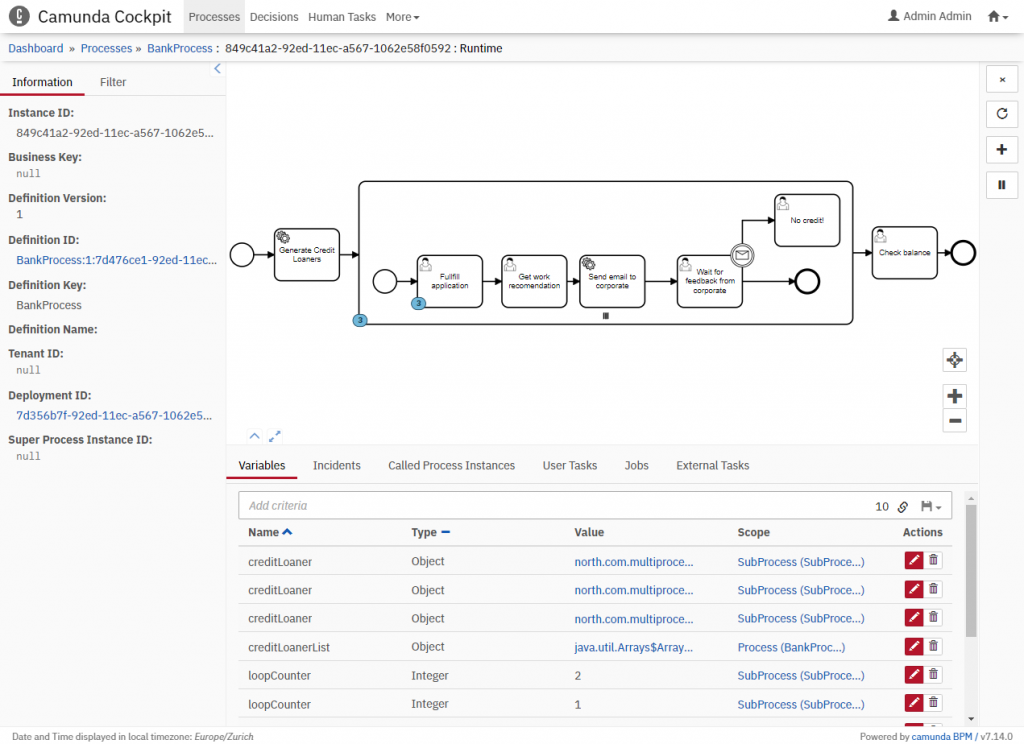
If you click on the subprocess (it is the largest rectangle with the three dashes) you will see the reason why we set the list of credit loaners as a variable value to creditLoanerList:
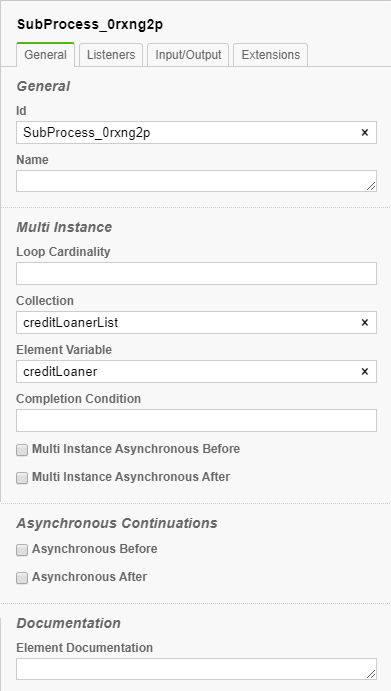
In order to pass all the credit loaners and for each of them a subprocess to be started we need to provide a collection of credit loaners. That is why we are setting the Collection field to: creditLoanerList and in order for every credit loaner to be accessed in the appropriate subprocess we are setting an Element Variable that we will call: creditLoaner. What will happen is that we will have this process once for Filip, once for John and once for Sarah.
Let’s look at the tasks in our subprocess. The first one Fulfill Application is a user task and in it, we want the credit loaner to fill out an application. For the next step Get work recommendation to be completed, the credit loaner needs to provide some documents that he is employed and has a regular salary (this is not completely implemented, but we are describing a possible scenario and currently only form fields of type string are defined). In the third step, a service task will be executed and in it, the NotifyCorporate.java class will be executed:
package north.com.multiprocessinstance.camunda.task;

import lombok.extern.slf4j.Slf4j;
import north.com.multiprocessinstance.entity.CreditLoaner;
import org.camunda.bpm.engine.delegate.DelegateExecution;
import org.camunda.bpm.engine.delegate.JavaDelegate;

@Slf4j
public class NotifyCorporate implements JavaDelegate {
    @Override
    public void execute(DelegateExecution delegateExecution) throws Exception {
        final CreditLoaner creditLoaner = (CreditLoaner) delegateExecution.getVariable("creditLoaner");
        log.info("Notify corporate that person {} wants to get credit", creditLoaner.getFirstName());
        delegateExecution.setVariable("creditLoanerFirstName", creditLoaner.getFirstName());
        log.info("This is the user: {}", creditLoaner);
    }
}
Here we will notify the corporate for the credit loaner and to get the information about the credit loaner we will use the variable that was previously set as a Element Variable which is creditLoaner (look at the image of the subprocess details). One additional thing that we will do here is to set one more variable called creditLoanerFirstName and the reason for that will be revealed when we take a look at the next task: Wait for feedback from corporate.
In this Wait for feedback from corporate step one option is that the bank guy got a mail from corporate that the credit loaner is ok and he can get his loan so the bank guy will complete this step and will continue with the next one. For the other option, we are providing a boundary event where the corporate will send a message STOP and for that credit loaner, the request will be rejected. But in our scenario, we have three subprocesses, one for each credit loaner. When sending this STOP message, we need to somehow specify for which credit loaner it is sent. That’s why in the previous step we set the creditLoanerFirstName variable (in real cases don’t use the first name but something like email or other unique value) and one last thing that we will need to do is to set an input parameter in the Wait for feedback from corporate task.
In the Camunda modeller if you click on the task with the name: Wait for feedback from corporate and go to the tab Input/Output you should be able to see the input parameter which will be of type text and the value will be the variable that we set previously, called creditLoanerFirstName.
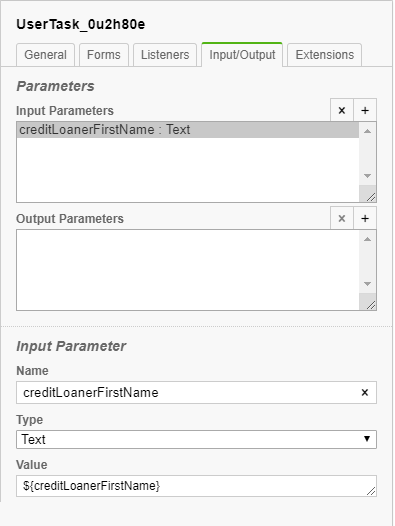
This input parameter provides us with an option to specify for which credit loaner we want to STOP the procedure and decline his loan request.
But let’s start our application and then start our bank process. Once you have started the application you can open the Camunda cockpit on the following URL: http://localhost:8080/camunda/app/tasklist/default/. The user name and password are admin and admin. Once you have entered the credentials you should be able to start a process from the top right by clicking on Start Process and the BankProcess will be provided (previously we needed to be sure that the BPMN file is saved under resources/processes in your application, since we define in our application.yaml that this will be the place where we will keep the processes).
Let’s take a look at the Camunda cockpit:
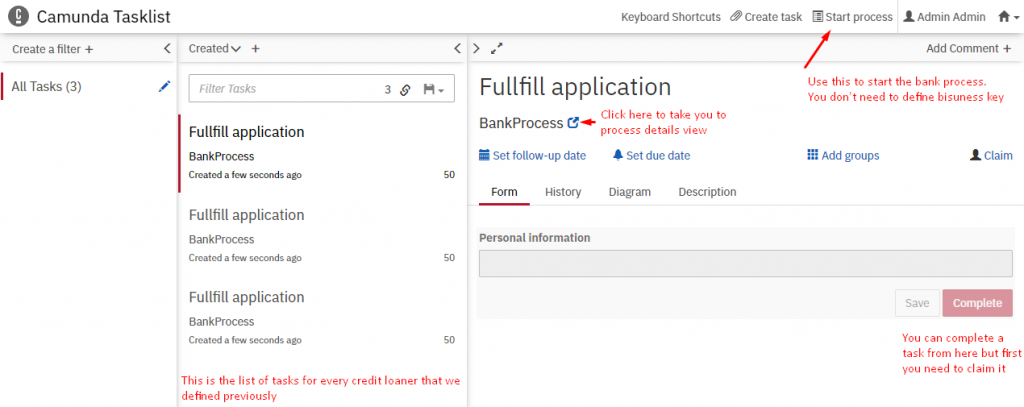
Once you started the process you should be able to see the task list (if for some reason they are not visible just click on Add simple filter and they should be displayed). If you click on one of the tasks, tasks details will be displayed and from here we are able to complete it or to open the process details:
Here we have a visual presentation at which step the process is currently. Let’s complete all three tasks Fullfill application by claiming them and completing them and let’s do the same for Get work recommendation. Now we are at the step Wait for feedback from corporate and we can test the boundary event STOP that we added.
There is already an exposed post endpoint in the ProcessController for which we need to provide the process instance id and a MessageEventRequest. In this MessageEventRequest we need to provide the message name, which in our scenario is STOP and a list of correlation keys. The correlation key is where we will specify the credit loaner whose loan request we want to decline. The key will be set to creditLoanerFirstName and let’s decline Sarah’s request (before executing it, make sure that there is a task: Wait for feedback from corporate for Sarah) so we will set the value to Sarah. What we need to do is execute a post request towards: localhost:8080/{processInstanceId}/messageEvent with the following request body:
{
    "messageName":"STOP",
    "correlationKeys":[{
        "key":"     ",
        "value":"Sarah"
    }]
}
As I mentioned previously you can figure out the process instance id and monitor the whole flow of the task using the camunda cockpit that will be available on the following URL: http://localhost:8080/camunda/app/tasklist/default/.
So we started a whole process, started three subprocesses, finished a service task and a user task. I hope that you enjoyed it and also you can find the code on the following link.