Service discovery is one of the key things of distributed systems. This allow us to automatically discover services on a network. In order to make some REST request, your service needs to know the service location. This service location includes IP address and port of a service instance. In the most scenarios, from the same service will be deployed multiple instances. The traditional applications are running on a physical hardware and the network locations are static. On the other hand, in the modern cloud-based microservice solutions, this network locations are dynamic. This makes them much harder to manage and more difficult challenge.
There are two main service discovery patterns:
- Client-side discovery (Eureka)
- Service-side discovery (Kubernetes)
Service Registry?
The Service Registry is a process that involves registering a service’s location to some central place. You can imagine that as a database of a service locations. The Instances of services would be register into the service registry on startup and deregistered accordingly. It will register it’s host, ports and some additional information like on the image below.
I have already created example application using Netflix Eureka service registry. It comes with some of the predefined annotations. For this purpose, I have created two spring applications. One of application will act as a discovery server. The application needs to include the following dependencies: Eureka Server, Spring Web, Actuator. I have added the @EnableEurekaServer annotation on the main class like on the code below. With this annotation, the app will act like microservice registry and discovery server.
@SpringBootApplication
@EnableEurekaServer
public class EurekaServerApplication {

    public static void main(String[] args) {
        SpringApplication.run(EurekaServerApplication.class, args);
    }
}
spring.application.name=eureka-server
server.port=8761
eureka.client.register-with-eureka=false
eureka.client.fetch-registry=false
The second Spring boot application will act as a client which will be registered on the eureka server (the first created application). This application needs to have the following dependencies: Actuator, Eureka Discovery, and Spring Web. We need to add the @EnableDiscoveryClient annotation on the Spring Boot app class and set up properties like on the code below into the application.yml file.
@SpringBootApplication
@EnableDiscoveryClient
public class ClientDiscoveryApplication {

    public static void main(String[] args) {
        SpringApplication.run(ClientDiscoveryApplication.class, args);
    }
}
spring.application.name=eureka-client-service
server.port=8085
eureka.client.service-url.defaultZone=http://localhost:8761/eureka/
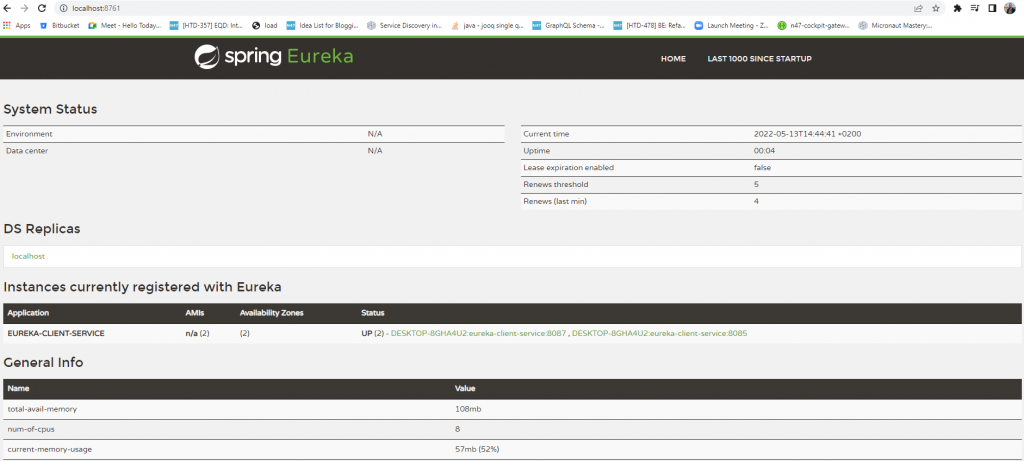
If we navigate on the following URL http://localhost:8761/ like on the image below. We can notice that 2 instances were registered on the eureka-client-service application and started on a different port. One of them was registered on port 8085 and the second instance in on port 8087.
Client-side discovery pattern
In this pattern, the client is responsible for determining the network locations of available service instances and load balancing requests. The network location of the service instance will be registered to the service registry when it start up and deregistered when it will be terminated.
The client is responsible for determining the network locations of available service instances and load balancing requests across them. The Service registry for client-side discovery which we are using in the previous example is Netflix Eureka Server. It provides management of service instances for querying available instances.
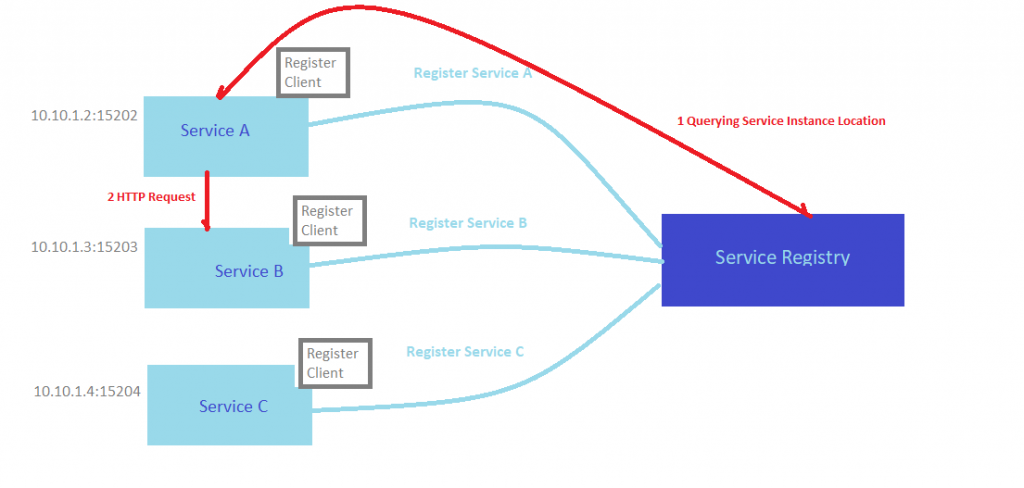
From the image below we can consider that we have 3 Services (Service A, Service B, and Service C ) which have different IP addresses provided to each service. For instance, the IP address of Service A is 10.10.1.2:15202. If we want to query the available instances, we need to access Service Registry (Eureka). The Eureka is responsible for storing the instances of all services that were previously registered.
- The locations of Service A, Service B and Service C are sent to the Service Registry like on the image below.
- The service consumer ask for the Service Discovery Server for the Location of Service A / Service B
- The location of Service A will be searched by the Service Registry which store the instance’s location
- The Service Customer gets the location of Service A and can make a direct request
Benefits of using this pattern
⦁ flexible, application specific load balancer
Drawback
⦁ must implement register and discovery mechanism for each framework
The significant disadvantage of this pattern is that it couples the client with the service registry.
Alternatives to Eureka discovery
Other alternatives on Eureka are Consul and Zookeeper. Consul makes it simple for services to register themselves and to discover other services via DNS or HTTP interface. Also, provides a richer health checking. It has its own internal distributed key value store that can we use it as well.
Apache Zookeeper on the other side, is a distributed key value store. We can use it as the basis to implement service discovery. A centralized service for maintaining configuration information, naming, providing distributed synchronization. One of the benefit is that we can use it with a large community that supporting it.
Service-side discovery pattern
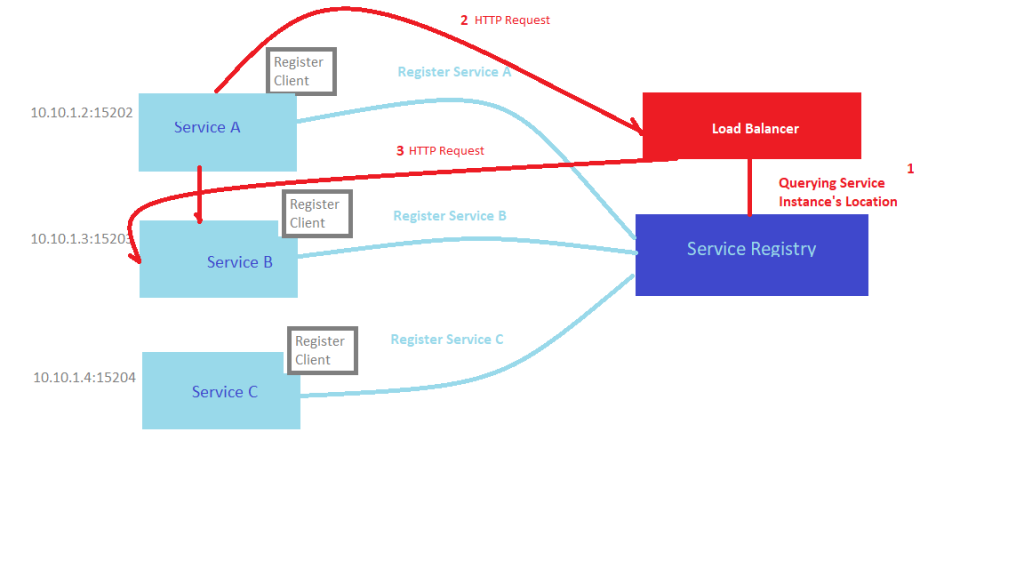
The alternative approach to Service Discovery is the Server-side Discovery pattern. Clients just make requests to a service instance via a load balancer, which acts as an orchestrator. The load balancer queries the service registry and routes each request to an available service instance like on the image below.
Benefits of using this pattern
⦁ no need to implement discovery logic for each framework used by service clients.
Drawback
⦁ need to set up and manage the Load Balancer, unless it’s already provided in the deployment environment.
Some of the clustering solutions such as Kubernetes, run a proxy on each host in the cluster. In order to make a request to the service, a client connects to the local proxy using the port which is assigned to that service.
From the image below we can consider that we have added Load Balancer, that acts as an orchestrator. The Load Balancer queries the Service Registry and routes each HTTP request to an available service instance.
Kubernetes
If we try to find some analogies between Kubernetes and more traditional architectures. I would compare Kubernetes Pods with service instances and Kubernetes Service with a logical set of pods.
Kubernetes Pods are the smallest, deployable unit in Kubernetes, which contain one or more containers, such as Docker containers. When a Pod runs multiple containers, the containers will be managed as a single entity and share the Pod’s resources. Each pod has its own IP address. When the pod restarts, it gets the new IP address. However there is no guarantee that the pod’s IP address will remain the same throughout all the time.
Kubernetes may relocate or re-instantiate pods at runtime. It doesn’t make sense to use the pod IP addresses for service discovery. This is one of the main reason to include Kubernetes Services into our story.
Service in Kubernetes
It is a component just like pod but it’s not a process. It’s just an abstraction layer which basically represents an IP address. Service will know to forward the request to one of the pods that have registered as service endpoints. On the other hand, unlike Kubernetes pods which don’t have the same IP address, the service has a stable IP address. Each service exposes an IP address and also exposes a DNS endpoint which will never change, even when the pod dies.
The Services provided by Kubernetes allow us to connect to our pods and provide a dynamic resource to access them. For instance, a load balancer can use these services to automatically determine which servers are trying to load balance. Services also provide load balancing ( if we have for example 3 instances of the microservice app, the service will get each request target to that and forward it to one of those pods).
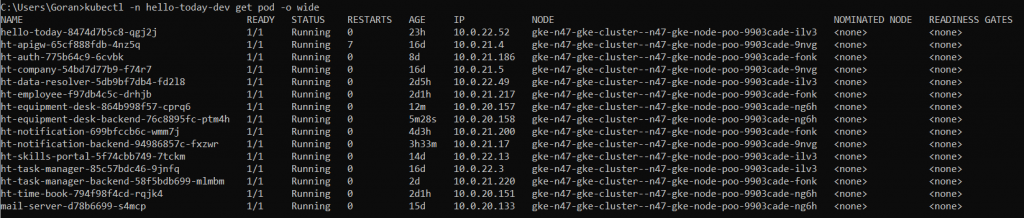
In Kubernetes we have a concept of namespaces, which present a logical group of resources. For our examples I will using hello-today-dev namespace which consists of couples of pods.
kubectl -n hello-today-dev get pod -o wide
kubectl -n hello-today-dev get svc
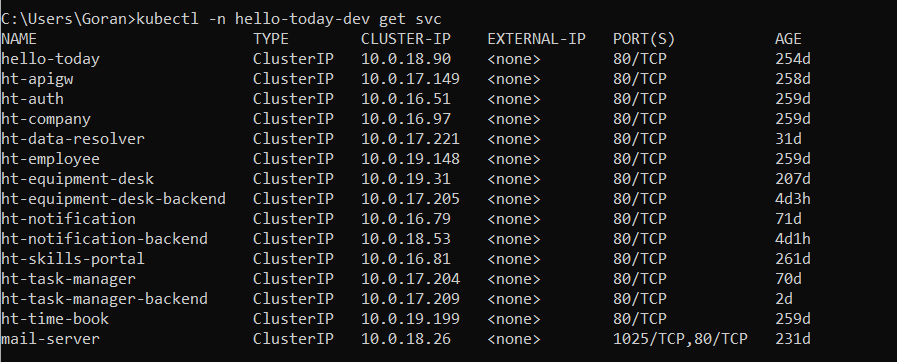
With this command we can see all available services in this namespace
How does Service Discovery work in Kubernetes?
Kubernetes has a powerful concept of labeling. Labels are just a key-value pair that provides metadata on our objects. Any pod whose labels match the selector defined in the service manifest will automatically be discover by a service.
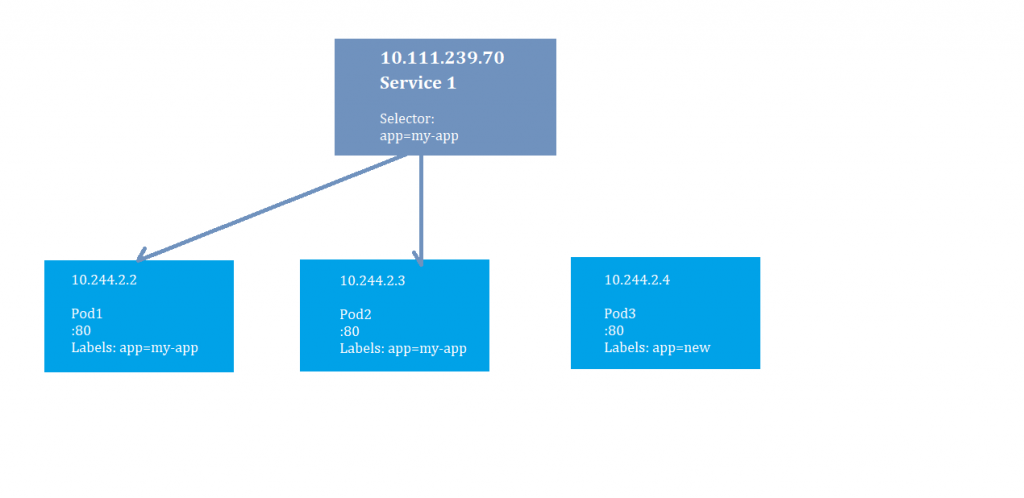
Here we have a single service that is front-ending two of our pods. The two pods have a label named “app:my-app” and the Service has defined a label selector that is looking for those same labels.
If we have a single service that is front-ending two of our pods, instances of our app. These two pods have a label named “app=my-app” and the Service has defined a label selector that is looking for those same labels. This means that the service will send traffic to them, even thought the pods might change their addresses. You might also notice that there is a Pod3 that has a different label. The Service won’t front end that pod.
Example of service selector
The other example is when in a service selector we have defined two labels (app = my-app, microservice). Then service will looking for both of labels and it must match all the selectors, not just one and it will register as its endpoints. This is how the service will know which pods belong to it meaning where to forward that request to.
kubectl -n hello-today-dev get pods –show-labels
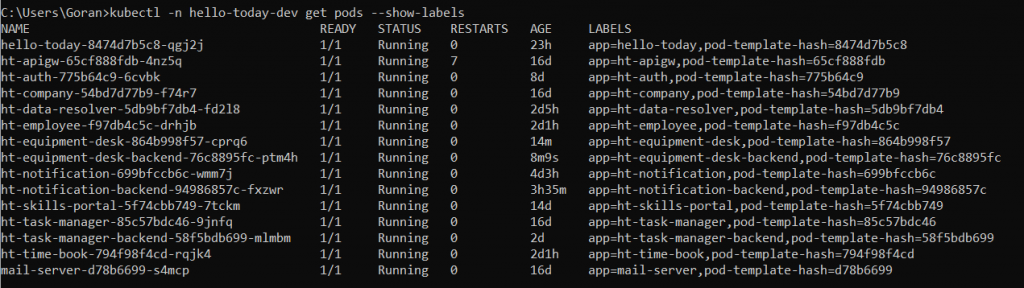
A service identifies its member pods using a selector attribute. We should specify a selector attribute which has a key-value pair defined as a list, which in our case is app = my-app. It creates a binding between the service and the pods with this name. It provides a flexible mechanism for service discovery, allowing us automatic load balancing. The Kubernetes will use the endpoints object to keep track of which pods are members of the service. Any pod whose label ‘s value (app=my-app) matches with the defined selector (my-app in our case) by the service will be exposed as its endpoint. Load Balancing will be provided by service by routing requests across matching pods.
kubectl -n hello-today-dev describe svc/ht-employee
The following command is to view the status of the service, in our case ht-employee. The service uses the selector app=ht-employee to select the pod 10.0.21.217 as backend pods. The virtual IP address in the cluster is created for the Kubernetes Service to evenly distribute traffic to the pod at the backend.
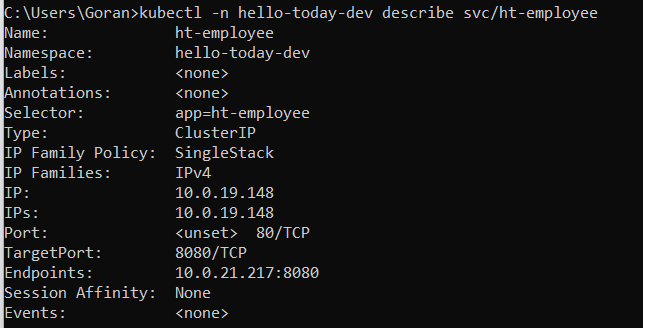
We can see the defined endpoints of ht-employee microservice (that means that our service is working)
If we have black endpoints it is the result of not selecting any pods, which means that your service traffic will go nowhere. The Endpoints field indicates the pods specified by the selector field.
Summary
Depending of the deployment environments you needed, you can set up your own service discovery using service registry like Eureka. In other deployment environments as in our case is Kubernetes, service discovery is build in. The Kubernetes, as was explained previously is responsible for handling service instance registration and deregistration.