Okay, it’s usually easy to start a VueJS project. There are many tutorials or Vue-Cli templates and with the Vue-Cli 3.x, it’s super easy to create your own. Here are some links:
- Creating a Project (vuejs.org)
- Vue CLI 3 – Creating our Project (Vue Mastery)
- Getting Started With Vue CLI 3 (CodingTheSmartWay)
- How to Set up Vue.js project in 5 easy steps using vue-cli (Subodh Garg)
BUT what if the requirements increase and become more demanding? Or if component/functional testing and typification are required? Or “newer” technologies such as GraphQL, serverless, state machines/diagrams and module dependency management come into play?
How to start?
We’ll start with the easiest way and use the VueCli API.
# via console
vue create professional-world
# or via the vue cli gui
vue ui
We will be prompted to pick a preset. First, select manually features.
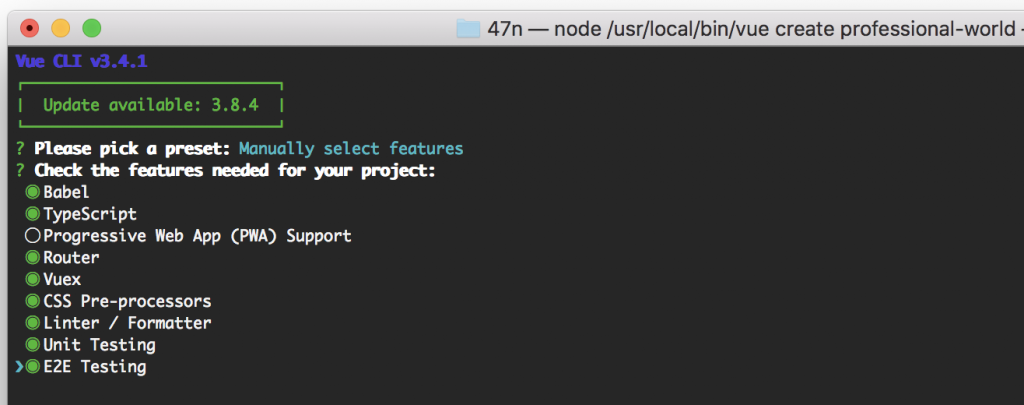
After we select these features, we will choose the following setup.
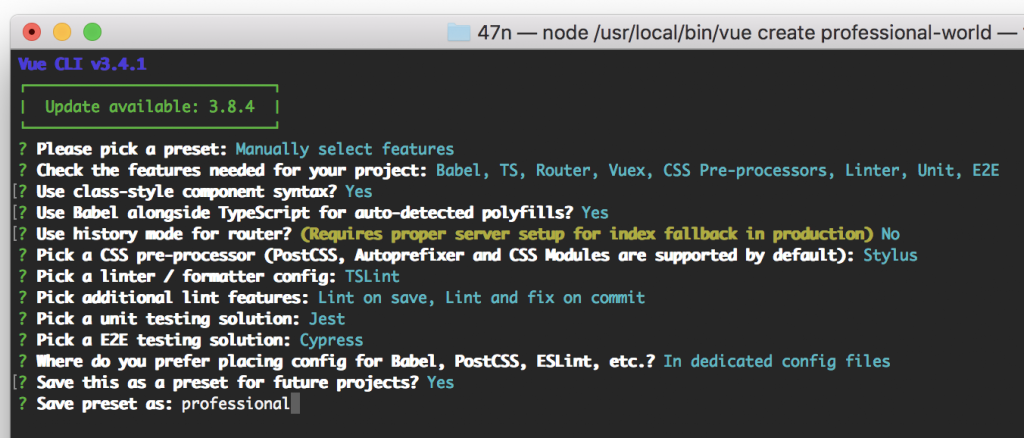
Some points about our setup:
- class-style
I choose this mode to show you the TypeScript decorator for class-style Vue components. But of course, you can take the normal style it is not so many new stuff for the first time. - history mode
We do not choose this router mode, because for a simpler environment setup. If you don’t like this – feel free to change this. Read more about it here. - css pre-processor
You can choose whatever you want. I prefer stylus regarding the less code. 😏 - lintner
It makes sense to activate here TSLint and also the auto-fix on commit. But we will addhuskyinstead of agit-hook. - cypress vs nightwatch
We choose cypress because it has some nice other testing features e.g. debuggability, automatic waiting, network traffic control, spies, stubs, clocks and screenshots and videos testing. But we will pay for it with the limited browser compatibility at the moment – later we will close this gap with regression tests. - config placing
I prefer to use in dedicated config files. It is easier to change and also thepackage.jsonis more readable if you add more dependencies.
Now we will add some more dependencies before we can start:
yarn add -D husky vue-cli-plugin-pug eslint-plugin-pug jest-image-snapshot- husky
It makes git hooks easy - pug
It’s a robust, elegant, feature-rich template engine for Node.js - jest-image-snapshot
It’s a jest matcher for image comparisons. Most commonly used for visual regression testing.
Last configurations
Husky needs to add the following file.huskyrc.js (If you want you can delete the links for the git-hook in the package.json😎
module.exports = {
  "hooks": {
    "pre-commit": "lint-staged"
  }
}
For pug, we add a vue plugin and also an eslint plugin. Eslint itself needs the following configuration in tslint.json.
"plugins": [ "pug" ],
Start coding
After this configurations we can start coding ☺️ Ok we start first with refactoring the example files from the Vue-Cli template to pug syntax. You can use for this a formatter e.g. html-to-pug.com.
Create a new file named .editorconfig and add following content. It helps you with keep the coding style – you do not need to worry about the format.
root = true

[*]
charset = utf-8
indent_style = space
indent_size = 2
end_of_line = lf
insert_final_newline = true
trim_trailing_whitespace = true
After this you should have this status from your project:
https://gitlab.com/47northlabs/public/a-professional-vue-world/tree/part-1
Following parts
- Coding with typescript, stylus and pug ( Part 2 )
- First steps with unit component, functional and e2e tests ( Part 3 )
- Vue and VueX meets state machines ( Part 4 )
- Apollo/GraphQL with serverless services ( Part 5 )
- Module dependency management in VUE ( Part 6 )