Introduction
Many people view the web as a 2D space to share information and express their creativity. It is almost like a canvas on which the author can draw everything imaginable. But over time, this canvas has evolved into something more powerful. With the release of WebGL a decade ago, new opportunities rose to escape the 2D boundaries for presenting content on the web.
But there is one caveat: 3D programming is hard. Doing low level graphics programming requires a good understanding of specific graphics specifications, such as OpenGL or Vulkan, rendering pipelines, linear algebra and so called Shaders (programs that run on your GPU). And if thats not enough, you also have to embrace the concepts of lighting models and rendering principles. I mean, just look at this:
Lo(x, ω) = Le(x, ω) + ∫Ωƒr(x, ω′, ω)Li(x, ω′)(—ω′ • n)dω′
Does this make you say “Awesome! I wanna learn 3D!”? Probably not. In fact, it most likely even has the opposite effect. And what you see here is one of the basic principles of 3D programming, the so called Rendering Equation. Well, so the conclusion of this post should probably be, that everyone should stay away from the idea to use 3D on the web and live on.
Not so fast. Luckily, there are libraries which make working with 3D actually enjoyable. One of these libraries is Three.js. In fact, this has become one of my favorite libraries of all time. I like it so much, that I created a personal website to express my love for Three.js.
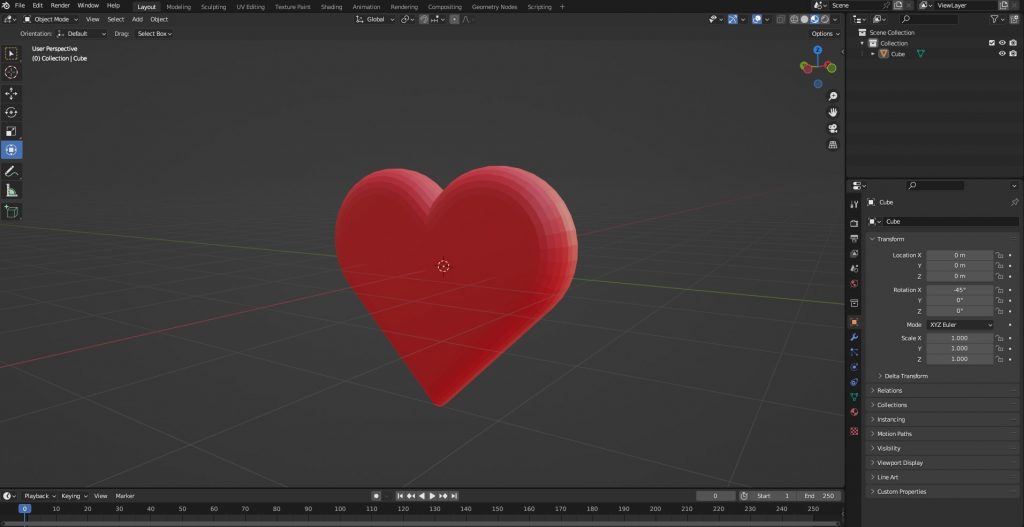
The website’s content looks like this:
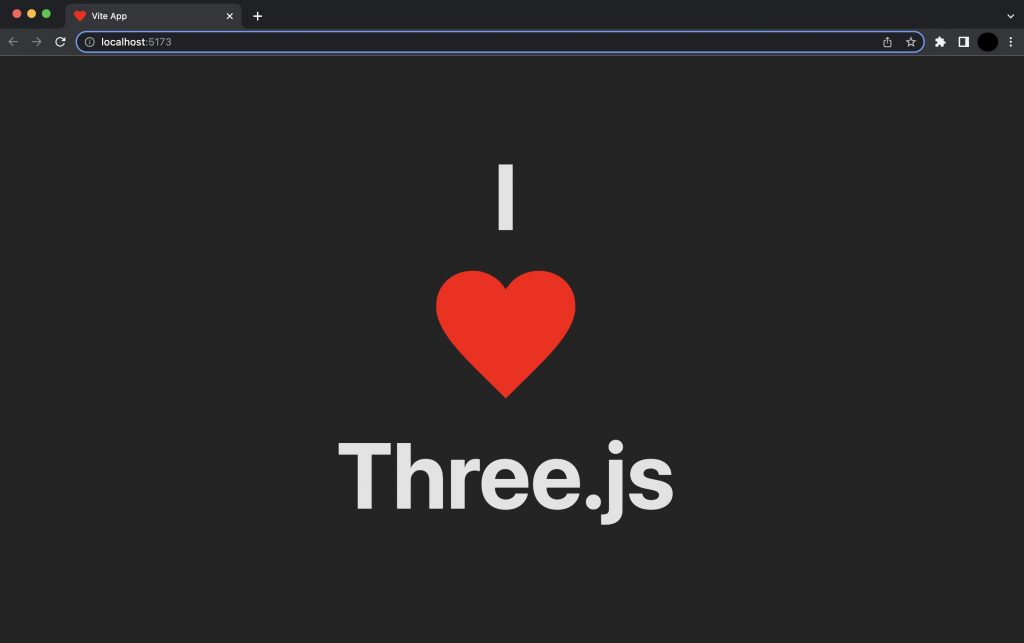
Even though it is a simple composition of plain text and a heart image, it delivers the message in a simple and elegant way. But we can improve it… by a lot!
Let’s just take a look at this variant:

The content conveys the same message, with the difference that an additional dimension was added to the website. And doing so was not as complicated as one might think. Let’s see how the boring 2D version can be turned into a real 3D experience.
Let’s get our hands dirty
Setting up a Three.js project
So, without further ado, let us jump in and start coding. The complete source code is available on GitHub. For the sake of simplicity, this project will use Vanilla JavaScript and Vite as the build tool (node.js 14.18+, 16+).
$ npm create vite@latest
$ cd <project-name>
$ npm install
After the initial project configuration, an example project including some boilerplate code will be ready. Let’s jump into the index.html file and modify it.
<!DOCTYPE html>
<html lang="en">
  <head>
    <meta charset="UTF-8" />
    <link rel="icon" type="image/svg+xml" href="/heart.svg" />
    <meta name="viewport" content="width=device-width, initial-scale=1.0" />
    <title>Three.js Project</title>
  </head>
  <body>
    <div id="app">
      <canvas id="render-target"></canvas>
    </div>
    <script type="module" src="/main.js"></script>
  </body>
</html>
It’s a fairly simple and small HTML snippet and actually all we need! The interesting part in this snippet is the canvas element. That’s where we will display the rendered scene. But we need to do some work before we get to his point.
Since Three.js is the star of this blog post, we will include it as a dependency to the project.
$ npm install threeNow the project has all the essential tools to create an exciting 3D web experience. Let’s jump right into the main.js file and let the magic happen. Starting off with the basics:
import './style.css'
import * as THREE from 'three'

const canvas = document.getElementById('render-target')
Here, the stylesheet that Vite generated will be imported (to have some sane defaults) as well as the previously installed three module (using Browser native ES6 modules). Afterwards, we store a reference to the canvas. We need it because we have to make Three.js aware of the drawing context. Next up, we make out first contact point with Three.js.
const scene = new THREE.Scene()

const fov = 75
const aspectRatio = window.innerWidth / window.innerHeight
const near = 0.1
const far = 100
const camera = new THREE.PerspectiveCamera(fov, aspectRatio, near, far)
camera.position.z = 4

scene.add(camera)
Ok, a lot of stuff is happening here. Let’s break it down:
- scene: A Three.js Scene holds the objects related to the virtual scene. It may contain other objects, light sources, cameras, etc. You can think of it as a theatre stage on which you e.g. can place your props or a video game town, which contains other objects, such as buildings, bridges or villagers.
- camera: Similar to capturing a beautiful moment in your life, we also need a camera to capture the contents of our scene to display it. In this case, we are using Three’s PerspectiveCamera which you can think of as a camera which captures the scene in a way, that we humans perceive our environment. But what does this mean?
- Imagine you have two equally sized cubes. One cube is right in front of you, while the other cube is 20 meters further away. Even though the cubes are of equal size, the difference in distance makes the one cube further away look way smaller than the cube in front of you.
- Or imagine a road which disappears into the horizon. Even though the road is equally broad at all points, the further it reaches into the horizon the smaller and thinner it gets, visually converging in one point.
- This camera model handles all of these effects. Besides that, the camera also manages which objects should be rendered, that being, the objects which are within the cameras view frustum, a truncated pyramid, considering all objects which are inside of it as “within the view field”. In the code snippet above, we also reposition the camera on the Z-Axis to have a better view on the scene and add it to the scene.
The additional properties, such as the Field of View (FOV), Aspect Ratio, Near and Far plane are best explained by the following visualization, provided on the Three.js Fundamentals website:
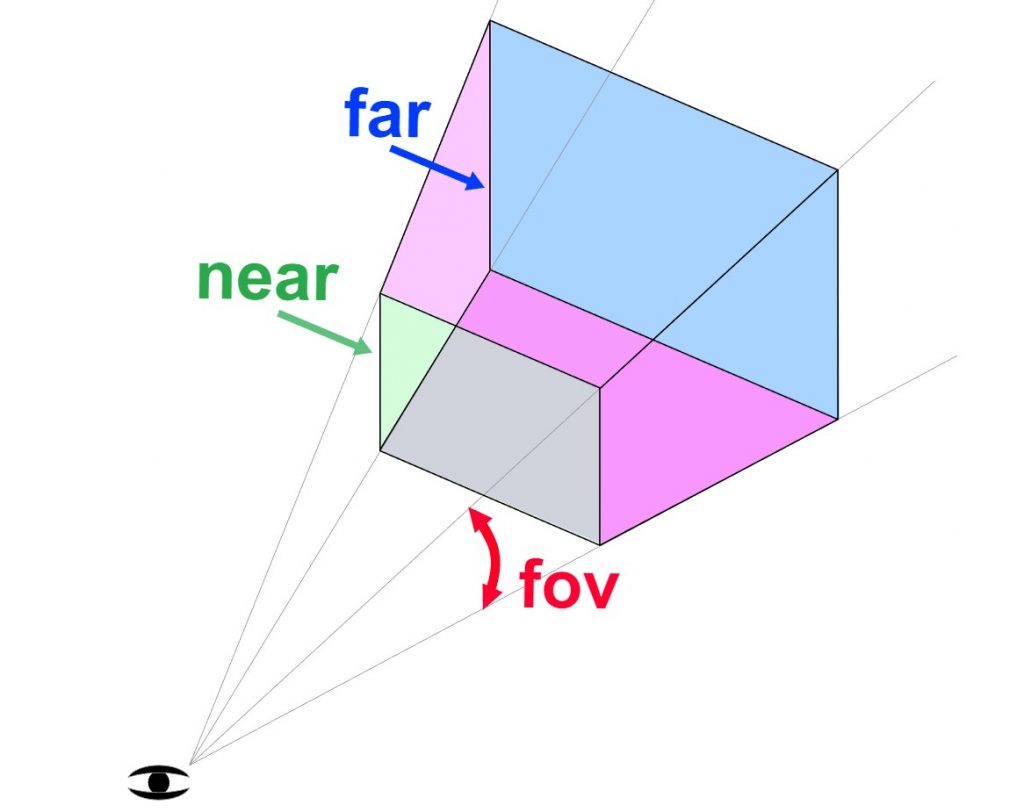
Source: https://threejs.org/manual/#en/cameras
Next up, the actual renderer, the WebGL Renderer to be precise, has to instantiated which will take care of rendering the scene and displaying it on the referenced canvas:
const renderer = new THREE.WebGLRenderer({ canvas })
renderer.setSize(window.innerWidth, window.innerHeight)
renderer.setPixelRatio(Math.min(window.devicePixelRatio, 2))

window.addEventListener('resize', () => {
   camera.aspect = window.innerWidth / window.innerHeight
   camera.updateProjectionMatrix()
   renderer.setSize(window.innerWidth, window.innerHeight)
   renderer.setPixelRatio(Math.min(window.devicePixelRatio, 2))
})
Again, let’s take a look what’s happening, step by step:
- renderer: An instance of the Three.js WebGLRenderer which is responsible for rendering the scene to the canvas. We also set the renderers size, which configures the size of the output canvas, as well as the viewport. The renderer also takes the Device Pixel Ratio (DPR) into account which we explicitly limit between 1 and 2 (you can read more about DPR here).
- resize handler: The code snippet also includes a resize handler, which ensures that the rendered scene preserves the configured aspect ratio on resizing the browser window.
- Imagine you have a scene with a perfectly round sphere. Now you start to resize your window by reducing or increasing the width. You probably would expect your sphere to stay round. Well, that’s not whats happening. You will notice that your sphere is squeezing or stretching, looking distorted and more like an oval. The Three.js documentation has some good examples regarding responsive design.
The last thing that’s missing, to make the initial scene complete, is an update loop
const update = () => {
   renderer.render(scene, camera)
   window.requestAnimationFrame(update)
}
update()
The update function instructs the instantiated renderer to render the entire scene from the view of the perspective camera. Additionally, the browser native requestAnimationFrame function is used to instruct the update function to call itself. This will instruct the browser to run the update function before its next repaint cycle. To start the loop, we explicitly call the update function once. How often the update function will run per second may vary from device to device, depending how many Frames per Second (FPS) the user’s browser is able to output.
After a bit of setup, the initial scene is done and can be inspected :
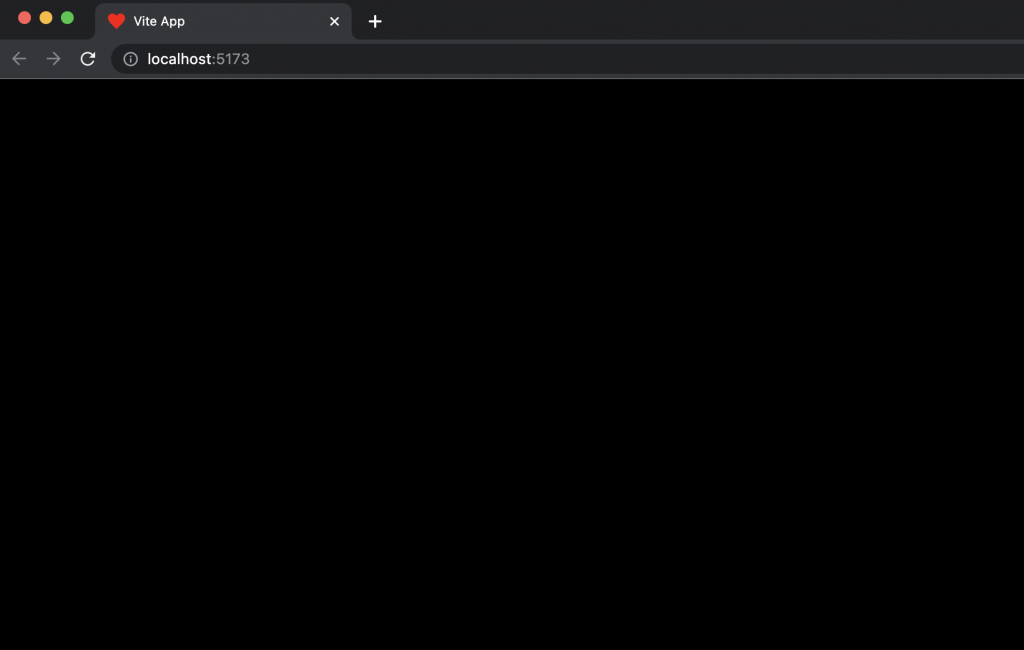
Well, it looks… blank. But don’t worry, that’s completely fine. At this point we didn’t add any visible objects to the scene. Let’s add a basic cube. Three.js luckily provides handy classes which allow users to instantiate a variety of predefined primitives.
Hello Cube
We will make use of Three’s BoxGeometry:
const width = 2
const height = 2
const depth = 2
const widthSegments = 1
const heightSegments = 1
const depthSegments = 1
const geometry = new THREE.BoxGeometry(
  width,
  height,
  depth,
  widthSegments,
  heightSegments,
  depthSegments
)
That was easy. But that’s not the entire cube yet. This just defines the geometry. We didn’t define any visual properties, such as color, yet. To do so, we need a so called a Material. For this example, we’ll define a red material.
const material = new THREE.MeshBasicMaterial({ color: 0xff0000 })Lastly, we need to combine the geometry and the material to form the final cube object, a so called Mesh, which will add to the scene:
const cube = new THREE.Mesh(geometry, material)
scene.add(cube)
cube.rotation.x = Math.PI * 0.18
cube.rotation.y = Math.PI * 0.25
We also applied a small rotation, so multiple faces of the cube are visible:

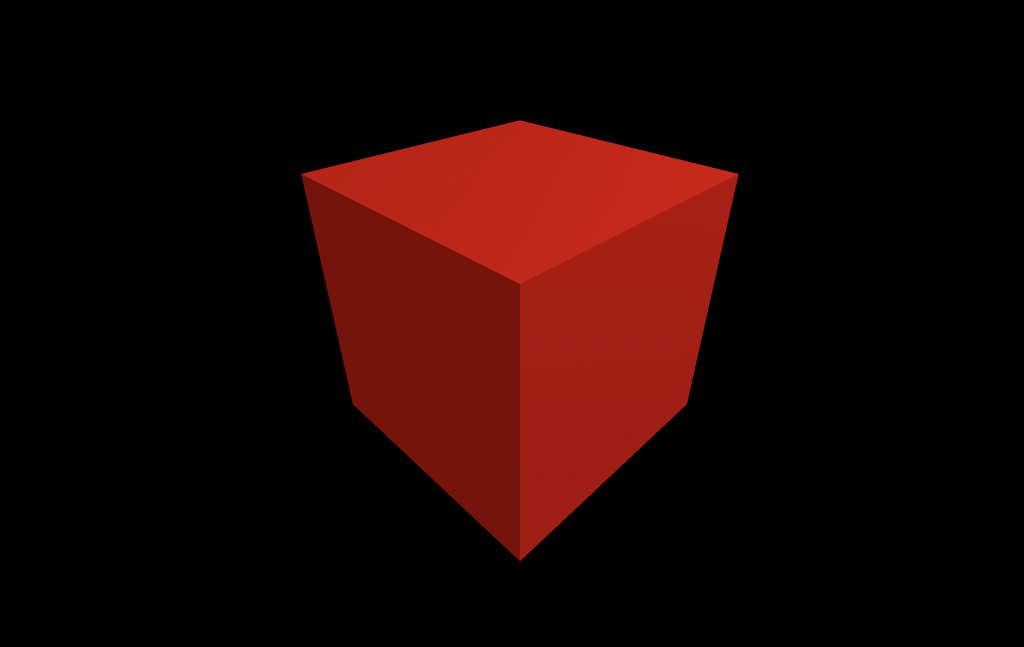
YAY!! We see something. But wait… It doesn’t really look as one would expect it to look.
It is red, yes, but something essential is missing. There is no feeling of depth. The cube simply has a uniform color. This makes it impossoble to e.g. see edges to distinguish the individual surfaces which make up the cube. This is due to two reasons.
- The used material does not interact with light
- No light source is present in the scene
Let’s fix that:
const ambientLightColor = 0xffffff
const ambientLightIntensity = 0.8
const ambientLight = new THREE.AmbientLight(
  ambientLightColor,
  ambientLightIntensity
)

const pointLightColor = 0xffffff
const pointLightIntensity = 1
const pointLightDistance = 100
const pointLight = new THREE.PointLight(
  pointLightColor,
  pointLightIntensity,
  pointLightDistance
)
pointLight.position.set(10, 10, 10)
scene.add(ambientLight, pointLight)

const material = new THREE.MeshStandardMaterial({
   color: 0xff0000,
   metalness: 0.5,
   roughness: 0.5,
})- ambientLight: The AmbientLight is a light source, which introduces a base global illumination in the scene. Let’s assume it’s dark outside and you didn’t turn on any lights. Do you see something?Indeed you do, since there will (in most cases) always be a base illumination. Even if it only enables you to roughly see obstacles and objects.
- pointLight: The PointLight is a light source which emits light from a defined point into all directions across a given distance.
- material: The previous MeshBasicMaterial, was replaced by a so called MeshStandardMaterial, which is affected by light and also defines properties such as metalness and roughness. This material is a Physically-based Rendering (PBR) material and aims to resemble surface properties of objects in a more realistic manner.
Now, let’s check out the cube once more and see what changed.
Doesn’t this look much better! It finally looks like a real 3D cube, with edges and different surface illuminations. Now we’re talking 3D! Now we are good to go and can start implementing the 3D example that we saw at the beginning: “I ❤️ Three.js”.
Personalizing our Three.js project
The first thing we need is a 3D heart. I created one in Blender which looks quite basic and doesn’t have a very complex geometry. This model is also provided in the example project on GitHub.
This heart model has the glTF 2.0 format, which is the recommended standard format for Three.js. Now we need to load the model into the project. Three.js provides various loaders to load specific files and models.
import { GLTFLoader } from 'three/examples/jsm/loaders/GLTFLoader'
import { FontLoader } from 'three/examples/jsm/loaders/FontLoader'
import { TextGeometry } from 'three/examples/jsm/geometries/TextGeometry'- GLTFLoader: We need the GLTFLoader to load the heart model
- FontLoader: We need the FontLoader to load a font for the creation of 3D text
- TextGeometry: We need the TextGeometry to create 3D geometry from a given text string.
Next we create a function to generate our text geometry. We define a function, since the same logic is needed to create the geometry for both strings: “I” and “Three.js“.
const createTextGeometry = (text, font) => {
   const textGeometry = new TextGeometry(text, {
      font,
      size: 0.5,
      height: 0.2,
      curveSegments: 12,
      bevelEnabled: true,
      bevelThickness: 0.02,
      bevelSize: 0.02,
      bevelOffset: 0,
      bevelSegments: 4,
   })
   textGeometry.computeBoundingBox()
   textGeometry.center()
   return textGeometry
}
The TextGeometry is simply configuring to manage properties such as the font, size, height, and bevel attributes to smoothen the text.
Next up, we instantiate the geometries for the two strings. Similar to the cube example, we need a material to create the meshes.
const fontLoader = new FontLoader()

fontLoader.load('fonts/helvetiker_bold.typeface.json', function (font) {
   const textGeometry1 = createTextGeometry('I', font)
   const textGeometry2 = createTextGeometry('Three.js', font)
   const material = new THREE.MeshStandardMaterial({
      color: 0xffffff,
      metalness: 0.5,
      roughness: 0.5,
   })
   const text1 = new THREE.Mesh(textGeometry1, material)
   const text2 = new THREE.Mesh(textGeometry2, material)
   text1.position.y = 1.2
   text2.position.y = -1.3
   scene.add(text1, text2)
})
Last but not least, we use the GLTFLoader to load the heart model and add it to the scene:
const gltfLoader = new GLTFLoader()
let model
gltfLoader.load('/Heart.gltf', (gltf) => {
   model = gltf.scene
   model.rotation.y = Math.PI * 0.5
   model.scale.set(0.4, 0.4, 0.4)
   scene.add(gltf.scene)
})
Let’s take a look at our scene once more.

Very nice! We did it. We have a 3D scene which displays our love for Three.js.
Let’s just do some little improvements. Notice how the scene is quite static? You cannot really look around or move stuff. You’re pretty much forced to look at the 3D scene from a fixed perspective.
Three.js provides some nice controls out-of-the-box. One of these controls are the OrbitControls allowing you to orbit the camera around your scenery:
import { OrbitControls } from 'three/examples/jsm/controls/OrbitControls'

const controls = new OrbitControls(camera, canvas)
controls.enableDamping = true

const update = () => {
   controls.update()

   if (model) {
      const elapsedTime = clock.getElapsedTime()
      model.rotation.y = 0.4 * elapsedTime
      model.position.y = Math.sin(elapsedTime) * 0.1
   }

   renderer.render(scene, camera)
   window.requestAnimationFrame(update)
}- controls: An OrbitControls instance which expects a camera and the canvas as arguments. We nee to update the controls explicitly in the update function.
- damping: Damping enables inertia when moving around the object. Therefore, releasing the mouse-press doesn’t make the movement stop instantly, but let’s it slowly come to a stop, like a car which slowly stops.
Now let’s also add an animation to the heart. It should slowly rotate around its Y-Axis as well as move up and down over time.
const clock = new THREE.Clock()

const update = () => {
   controls.update()
   if (model) {
      const elapsedTime = clock.getElapsedTime()
      model.rotation.y = 0.4 * elapsedTime
      model.position.y = Math.sin(elapsedTime) * 0.1
   }
   renderer.render(scene, camera)
   window.requestAnimationFrame(update)
}- clock: We have to be cautious when implementing animations. Remember when I said, that the frequency of the update call differs from user to user? A user with a high-end PC may run this loop 60 times per second, while a user with a lower-end device may run this loop only 30 times per second. Now imagine that the model rotates by 1 degree every frame. The heart will rotate faster for the first user (60 degrees per second) than for the second one (30 degrees per second). Luckily, there is a fairly simple method to make such animations framerate-independent.
We use the elapsed time between consecutive frames as a weighted factor for the amount of (here) rotation. Think about it:- Lower FPS means more time between consecutive frames. This results in a higher rotation amount per frame.
- Higher FPS means less time between consecutive frames. This results in a lower rotation amount per frame.
Now we are done! We can see our final result and appreciate it. Not that hard, wasn’t it?
Conclusion
Creating 3D applications is not that hard and can be done without diving to deep into the low-level territory due to amazing libraries, such Three.js. It is therefore quite simple to elevate your website and create a 3D experience which many users would only expect from a native application. As seen in this post, the difference between a classic 2D approach and the equivalent 3D visualization is enormous and does not only introduce more visual fidelity, but also give you as the creator of a website new opportunities to introduce interactivity, turning previously static content into a game.
Further Examples
If you are interested in further exploring some examples of awesome Three.js projects, then you should check out the curated gallery of Three.js projects on the official Three.js website.