The practical guide – Part 1: Refactor android application to follow the MVP design pattern
The practical guide – Part 2: MVP -> MVVM
We know what design patterns are and how to implement them. But, if we want to have a more robust, scalable, maintainable, and testable application we have to do more. Today we will learn how to implement Clean Architecture proposed by Robert C. Martin (Uncle Bob).
Why is Architecture important?
Architecture is important for managing the complexity of the project. So, for a small project, we may not need one, but for big ones, it is a lifesaver. It makes the project easier to maintain, scale and test. It also makes the project more organized, so everyone can understand what the project is about with only looking at the classes.
Clean Architecture Introduction
Design patterns told us how to separate presentation and manipulation with the data. A clean architecture (like any other architecture) goes a little deeper and shows us how we should separate the manipulation of the data. Clean architecture has only a few layers, and each layer has its own responsibilities.
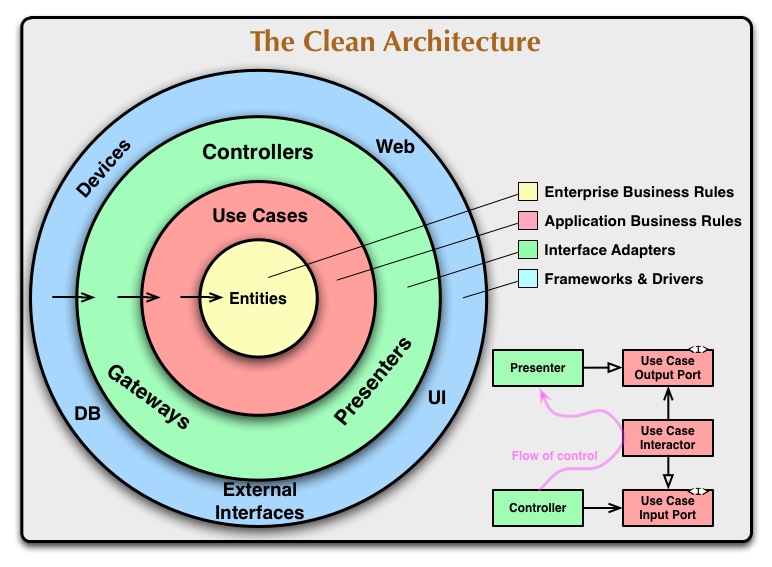
You have probably seen this image. It tells us how the layers are organized. As we can see, there are outer layers and inner layers. That is important because there are few rules that we have to follow:
- Every layer can communicate only with the inner layers. So, the layers don’t know anything about the outer layers. The dependencies are provided by outer layers with Dependency Injection (hopefully I will make a post about this).
- The most inner layer is the most abstract, and the most outer layer is the most concrete. This means that inner layers should contain business logic and outer layers should contain the implementation.
You may have noticed that I mentioned a few layers and not an exact number. That is because the clean architecture doesn’t define an exact number of layers. You can adapt the number of layers to your needs.
The flow
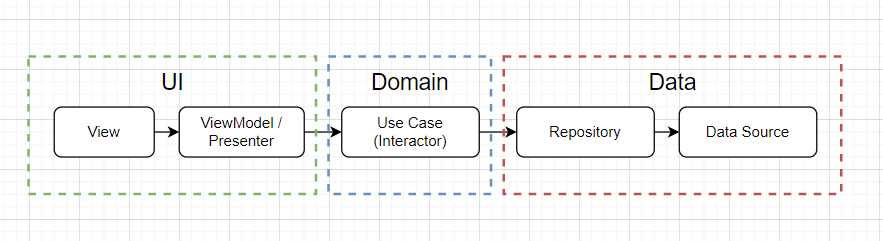
- View – The responsibility for the view stays the same as specified in the design patterns. Its only responsibilities are to display the data and react to user actions.
- View Model/Presenter – Also, specified in the design patterns, their responsibility is to pass the data between the view and the model. But, instead of making the network/database calls, it uses the Use Cases for it. So, these classes shouldn’t know, where the data comes from, or where it goes. It just passes the data between the Use Cases and the Views.
- Use Case (or Interactor) – These are the actions that the users can trigger. It contains the data that the action needs for it to be completed, and calls the repository to do the action. It can decide on which thread the action should be done, and on which thread the result should be posted.
- Repository – The responsibility of the repository is to decide which data source the data needs to be handled. For every Use Case, there should be a method in the repository.
- Data Source – There may be few data sources per application, like Network, Database, Cache etc. It contains the actual implementation of the data source.
Between every layer, we can have Mapper classes since the data can differ between layers. For example, we would like to store different data in a database from the one that we get from the network.
The implementation
Let’s start with the data sources. We will create two data source interfaces: RemoteDataSource and LocalDataSource.
interface RemoteDataSource {
  fun getQuotes(): Call<List<Quote>>
}

class RemoteDataSourceImplementation(private val api: QuotesApi) : RemoteDataSource {
  override fun getQuotes(): Call<List<Quote>> = api.quotes
}
interface LocalDataSource {
  fun insertQuotes(quotes: List<Quote>)
  fun getQuotes(): List<Quote>
}

class LocalDataSourceImplementation(private val quoteDao: QuoteDao) : LocalDataSource {
  override fun insertQuotes(quotes: List<Quote>) {
    quoteDao.insertQuotes(quotes)
  }

  override fun getQuotes(): List<Quote> = quoteDao.allQuotes
}
As you can see, we added only one method in RemoteDataSource, just for getting the quotes, but there are two methods in LocalDataSource since we have to store the quotes to the database after getting them from remote. The very important thing here is to notice that we are not creating the DAO and API objects, but we are asking for them to be provided in the constructor (Dependency Injection). This will enable us easily to switch to different network or database libraries and we won’t have to change anything here.
Let’s continue with the repository. We said that its responsibility is to decide where the data will come from. In our case, we want to return the quotes from the network, but if something fails we want to display the quotes from the database.
interface QuotesRepository {
  fun getQuotes(): List<Quote>
}

class QuotesRepositoryImplementation(
  private val localDataSource: LocalDataSource,
  private val remoteDataSource: RemoteDataSource
) : QuotesRepository {
  override fun getQuotes(): List<Quote> {
    return try {
      val response = remoteDataSource.getQuotes().execute()
      if (response.isSuccessful) {
        val quotes = response.body() ?: return localDataSource.getQuotes()
        localDataSource.insertQuotes(quotes)
        return quotes
      }
      localDataSource.getQuotes()
    } catch (e: Exception) {
      localDataSource.getQuotes()
    }
  }
}
It is a dumb logic, but I made it like that just for simplicity. Also very important is that we are using the interfaces, and not the actual implementation.
Let’s move to the use case. Here we will use the repository and we will switch between threads. We will use Kotlin coroutines, but you can use anything. If you are working with RxJava, here you will specify the Schedulers.
class GetQuotesUseCase(private val quotesRepository: QuotesRepository) {
  fun getQuotes(onResult: (List<Quote>) -> Unit = {}) {
    GlobalScope.launch(Dispatchers.IO) {
      val response = quotesRepository.getQuotes()
      GlobalScope.launch(Dispatchers.Main.immediate) {
        onResult(response)
      }
    }
  }
}
Usually, there is a base UseCase class, where you abstract the logic for threading. For simplicity, I skipped the error handling.
Last, we can clean up the ViewModel. I also converted it to Kotlin, and now it looks like this:
class MainViewModel : ViewModel() {
  lateinit var getQuotesUseCase: GetQuotesUseCase

  var quotesLiveData = MutableLiveData<List<Quote>>()

  fun getAllQuotes() {
    getQuotesUseCase.getQuotes { quotes: List<Quote> ->
      quotesLiveData.postValue(quotes)
    }
  }
}
I won’t explain anything here, I will just let you admire. Just kidding! You must be asking how we create getQuotesUseCase. But that is a story for another time. For now, I will create a class DependencyProvider, and I will provide everything there. You don’t have to worry about this for now.
And that’s it. Now we have an application that follows Clean Architecture guidelines. Here is the link for the project.
Final Notes
Now that our project follows Clean Architecture guidelines we can do many things. We can easily change frameworks and libraries with as little changes as possible (just changes at the DependencyProvider and everything will work). We can organize the application better with many repositories and many data sources. The project will be easy to understand, just by looking at the use cases. Testing of the application will be very easy (hopefully I will make a post about that, too).
I hope that this post will help you understand how Clean Architecture works in practice. If you have any questions or need any help don’t hesitate to ask. Happy Coding!